Contents
- 1 Does this sound familiar?
- 2 The Science Behind Effective DIY Stainless Steel Cleaner
- 3 Essential Ingredients for Your DIY Stainless Steel Cleaner
- 4 Step-by-Step Instructions for DIY Stainless Steel Cleaner
- 5 Pro Tips for Using Your DIY Stainless Steel Cleaner
- 6 Advanced Techniques for Stubborn Stains
- 7 Want a Printable Version of This Recipe?
I used to despise entering my kitchen each morning, not due to unwashed plates or messy surfaces, but because of something far more annoying – the endless fight against smears, mineral deposits, and marks covering every surface of my stainless steel equipment.
Does this sound familiar?
Similar to countless homeowners, I discovered myself repeatedly cleaning my refrigerator, dishwasher, and exhaust fan, only to notice fresh blemishes appearing within mere hours. The costly store-bought cleaners I purchased claimed “no-streak brilliance,” but frequently left residue that worsened the situation.
That’s when I chose to develop my own DIY stainless steel cleaner formula. Following extensive months of experimenting with various combinations, I eventually mastered a recipe that produces expert-quality results at significantly lower expense.
The Science Behind Effective DIY Stainless Steel Cleaner
Developing an efficient DIY stainless steel cleaner demands comprehending what creates those persistent marks and how various components function together. Stainless steel surfaces develop water marks because of mineral accumulation, while finger oils generate smears that appear to spread continuously during the day.
The secret to creating a successful stainless steel cleaner involves mixing components that tackle numerous cleaning obstacles at once. White vinegar offers natural acidity to dissolve mineral accumulation, while isopropyl alcohol functions as a degreasing solution and dries rapidly to avoid streaking.
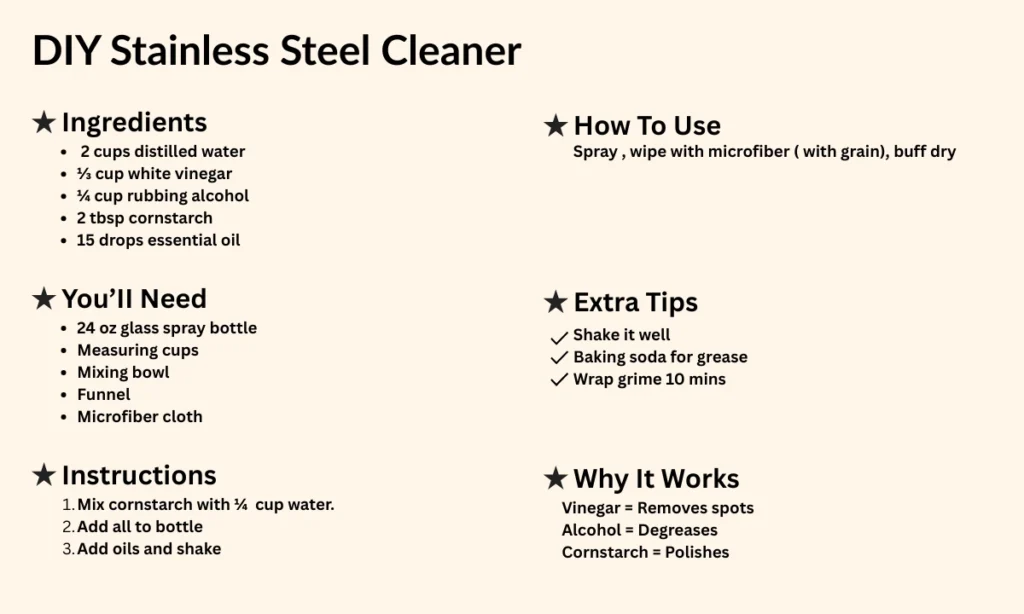
Essential Ingredients for Your DIY Stainless Steel Cleaner
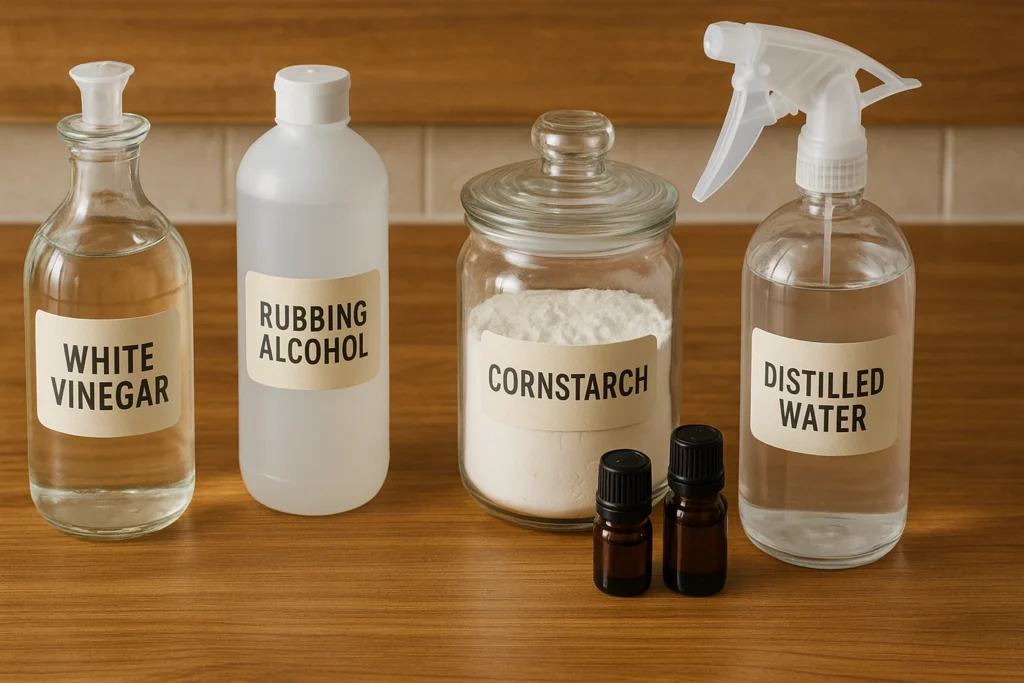
This DIY stainless steel cleaner formula utilizes basic, budget-friendly components you probably already possess at home:
- Purified water (2 cups) – Avoids mineral accumulation that regular water could create
- White Vinegar (1/3 cup) – Natural acid that eliminates mineral formation and water marks
- Isopropyl Alcohol (1/4 cup) – Removes grease and dries quickly for a no-streak finish
- Cornstarch (2 Tablespoons) – Forms a protective coating and enhances cleaning
- Effectiveness Essential Oil (15 drops) – Offers natural antimicrobial benefits and an appealing fragrance
The cornstarch in this cleaner mixture functions as a natural buffing agent, forming a protective coating that resists future smudges and water marks. This component distinguishes between a basic cleaner and a commercial-quality formula.
Step-by-Step Instructions for DIY Stainless Steel Cleaner
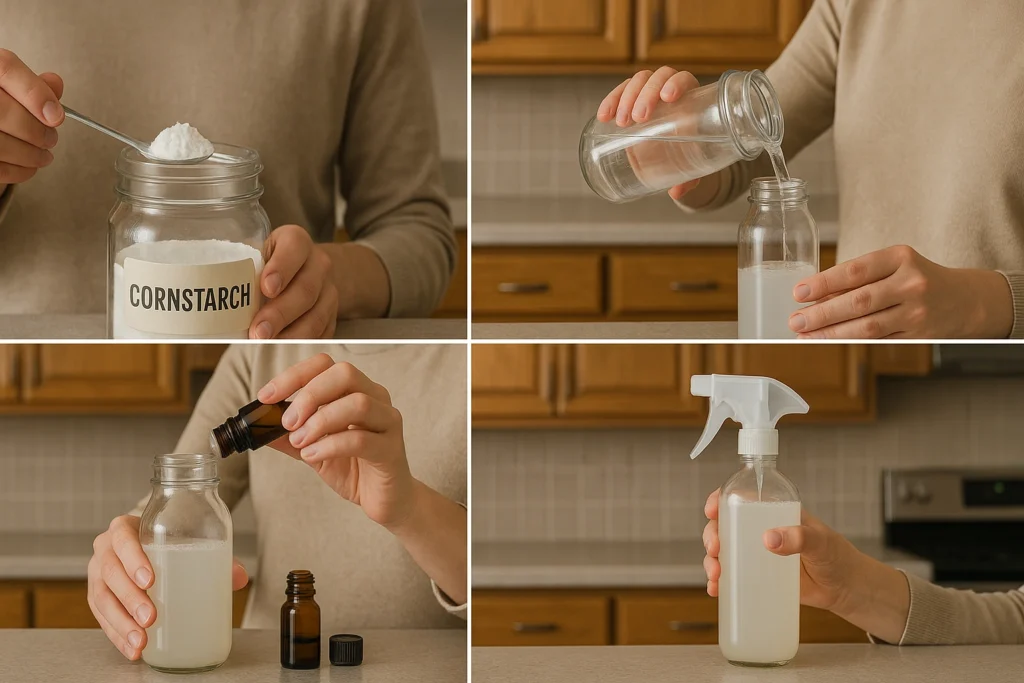
Making your own stainless steel cleaner requires under 10 minutes and needs basic equipment:
Step 1: Prepare your workspace: Collect a 24-ounce glass spray container, measuring tools, a small mixing dish, and a funnel. Glass vessels work optimally for this steel cleaner since they won’t interact with the vinegar.
Step 2: Dissolve the cornstarch: In a small dish, combine the cornstarch with 1/4 cup of cold purified water until entirely smooth. This avoids lumping when you incorporate it into your stainless cleaner blend.
Step 3: Combine liquid ingredients: Using the funnel, transfer the cornstarch blend into your spray container. Include the remaining purified water, white vinegar, and isopropyl alcohol to form your stainless cleaner foundation.
Step 4: Add essential oils: Select oils with natural antimicrobial qualities like tea tree, lavender, or lemon. These improve your DIY stainless steel cleaner with both cleaning effectiveness and a refreshing aroma.
Step 5: Mix thoroughly: Attach the spray nozzle and shake energetically for 30 seconds. Your stainless steel cleaner is now prepared for application.
Pro Tips for Using Your DIY Stainless Steel Cleaner
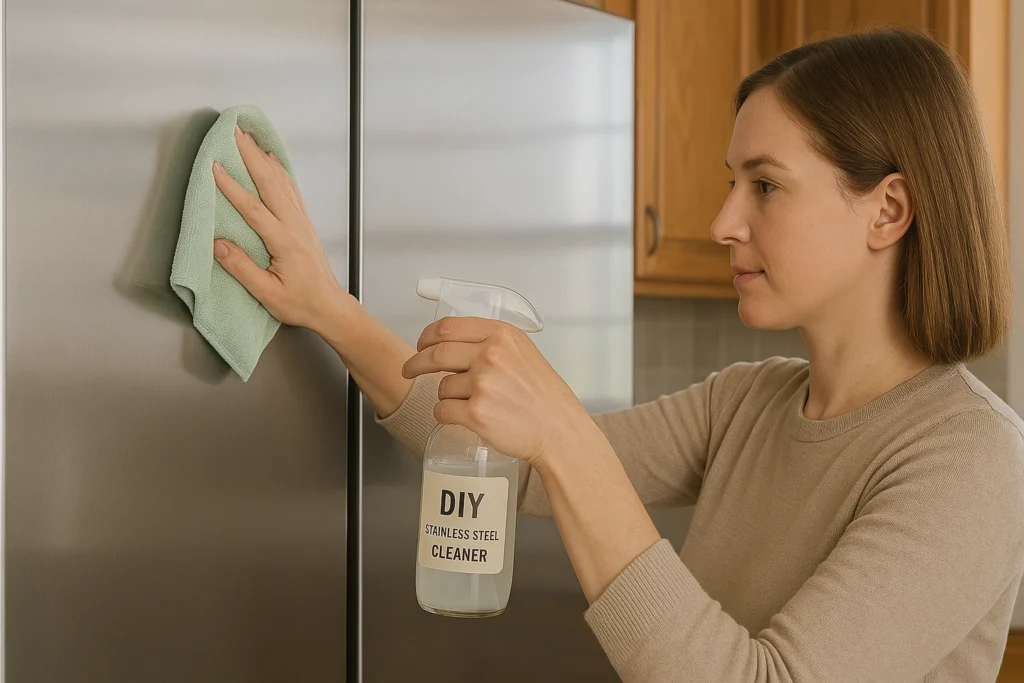
Achieving expert results with your cleaner demands the correct method:
Always agitate before application – The cornstarch separates, so mixing guarantees uniform distribution throughout your steel cleaner.
Test on a small section first – Although this steel cleaner is mild, testing avoids any unexpected interactions with particular surfaces.
Clean following the grain – Stainless steel contains a natural grain pattern. Wiping parallel to these lines with your stainless cleaner avoids scratching.
Utilize microfiber cloths – These capture dirt and oils more efficiently than paper towels when using your steel cleaner.
Work in portions – Apply your stainless steel cleaner to one appliance at a time for optimal results.
Advanced Techniques for Stubborn Stains
Occasionally, your DIY stainless steel cleaner requires additional assistance with difficult spots:
For water stains: Apply your steel cleaner and allow it to remain for 2-3 minutes before wiping. The vinegar requires time to break down mineral accumulation.
For grease buildup: Make a paste using baking soda and a small quantity of your DIY stainless cleaner. Gently scrub with a soft cloth, then rinse with your regular steel cleaner formula.
For dried-on food: Spray your stainless steel cleaner liberally and cover with plastic wrap. Allow it to soak for 10 minutes before wiping clean.
Want a Printable Version of This Recipe?